🧠 Neural Network Image Recognition

I dance with neural networks.
It might sound odd to you, or silly even. But I do. Training a deep learning neural network is a dance. And to anyone who has never danced that dance, all I can do is try to describe it. I will make that attempt here.
I am obsessed with low loss and high accuracy. It is not a bad obsession. It is simply what drives the dance. The model and I trade turns taking the lead and seeing how the other will react to our most recent shift. Sometimes it is excruciating. Other times, it can make my entire day! Sometimes I could swear that it can even make the sun shine more brightly.
For example, taking this PyTorch, multi-layer linear regression model from 94.61% accuracy to 98.21% was a constant back and forth between the model and me, but once I could feel out the resulting shifts stemming from my rearranging of the various hyperparameters (which was sometimes initiated by curiosity, sometimes by a little frustration, but often times by intuition), I realized the direction the model was leading me. And I followed. In fact, I know that getting to know the model even more, I could get even better. But I am happy here for the time being.
The extent to which I can sit on the metaphorical edge of my seat while waiting for that next print statement to tell me I hit the jackpot is a kind of anticipation I honestly had never known until working with machines like this. I think what makes it so intense is that this is not a gambling type of jackpot. There is no house that I am up against. I have control over the entire situation. It is just me and a machine. But how do I get what I want? How do I get this machine to give that to me? And therein lies the dance. The dance is within me. And that is why I love this.
Let's go ahead and look at the data and take a walk through the dance. I hope you enjoy it as much as I did while working on this project.
About the MNIST Dataset:
From Wikipedia:
The MNIST database (Modified National Institute of Standards and Technology database[1]) is a large database of handwritten digits that is commonly used for training various image processing systems.[2][3] The database is also widely used for training and testing in the field of machine learning.[4][5] It was created by "re-mixing" the samples from NIST's original datasets.[6] The creators felt that since NIST's training dataset was taken from American Census Bureau employees, while the testing dataset was taken from American high school students, it was not well-suited for machine learning experiments.[7] Furthermore, the black and white images from NIST were normalized to fit into a 28x28 pixel bounding box and anti-aliased, which introduced grayscale levels.[7]
The MNIST database contains 60,000 training images and 10,000 testing images.[8] Half of the training set and half of the test set were taken from NIST's training dataset, while the other half of the training set and the other half of the test set were taken from NIST's testing dataset.[9] The original creators of the database keep a list of some of the methods tested on it.[7] In their original paper, they use a support-vector machine to get an error rate of 0.8%.[10]
Step One: importing, importing, importing!
I started out initially with a batch size of 100 and ended up keeping that, because after a few experiments with varying it and having really good model training times with this setting, it made sense to keep it. I made good use of Google Colab's GPU option on this project! It makes training a model well so much easier.
Step Two: Hyperparameters
This could really be steps two through the end. Because while yes, I defined them early on, this is where I spent 80% of my time. These few little lines make up so much of the dance. For example, working with the learning rate, I was amazed where I found tiny thresholds that made huge differences once crossed.
I usually use functions to test various learning rates and other hyperparameters and then plot out the results and come up with all my values that way, by combining all those results. But with this model, it did not take long to narrow down the corridor that got very good results.
I was very happy when I found that I could go ahead and go with all threes in my hyperparameters, and I ended up getting the highest accuracy thus far this way. So I kept it, since 3 seems to be this model's lucky number!
Step Three: Investigating the Data
Here is a quick look at a few of the images in the training data. By iterating over the data in the train loader and using Matplotlib to recreate the images, we can take a look.
Step Four: Defining the Model
The model is rather simple conceptually, a linear model that feeds into a ReLU activation function, back into another linear model, and tada! Accuracy!
Step Five: Training the Model
I was overjoyed when I got the hyperparameters just right so that my loss only bounced a couple of times over the course of the training. I tried to limit the progress print outs to be enough to get a good idea of what is going on and not so many that there are seemingly endless lines. So you can see here the nicely declining loss rate, which really can make a girl happy! Well, it can for this girl at least.
Step Six: Testing the Model's Accuracy
This is the part that always makes me nervous. I was never that competitive with other people throughout my life, but I have ALWAYS been competitive with myself. If I get something to a certain level of success, I am always wanting to find and reach that next level. So I probably rand these last two cells over code...well, more times than I can remember.
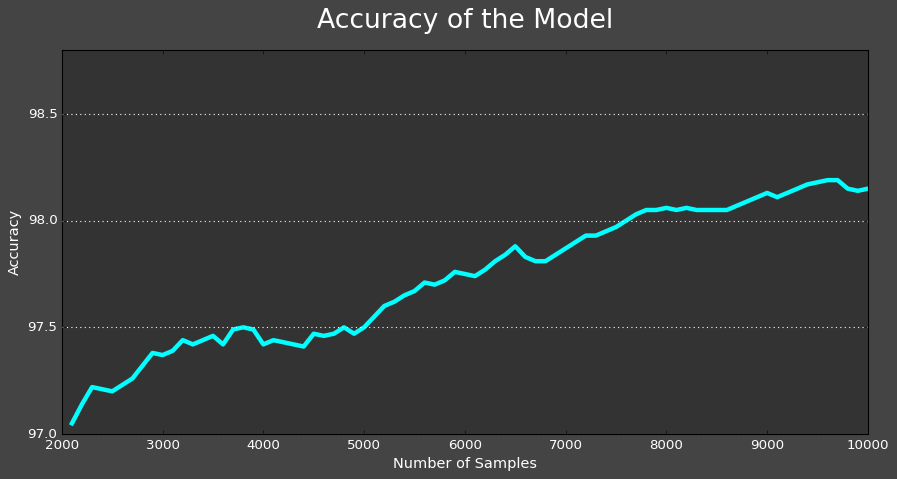
And here is a plot of the accuracy rate as the model went through its training process. It made a slow and steady climb. Now, that is a lovely plot!
So there you have it, my little dance with "the machine" and my own mind. I hope you enjoyed it!
- Special thanks to Patrick Loeber at Python-Engineer.com for his great resources!